

This article is originally from the WeChat Official Account [PY Study Notes]. After contacting and obtaining the developer's consent, the project is shared as open source.
Original link: Click to jump
Preface
In this fast-developing world of technology, wireless communication has become an indispensable part of our daily lives. But have you ever thought about implementing wireless technology yourself to control a real physical device? This is not only a deepening of your understanding of technology, but also a challenge to your creativity.
Imagine, if you could control the movement of a car with just your phone, without any cables, what would that experience be like? If you want to turn this imagination into reality, then this article is exactly what you need.
What we are going to explore is how to use the ESP32S3 — a microcontroller with powerful wireless communication capabilities — to make a car that can be controlled via Bluetooth. This is not just about assembling a few parts or writing some code; it is about understanding how wireless communication works and how to apply these abstract concepts to actual physical objects.
But this task is not without challenges:
- You will need to understand how the ESP32S3 works and how it processes wireless signals.
- You need to design a way for the car to receive and parse Bluetooth signals from the phone.
- You need hands-on practice, assembling the car from scratch and ensuring that all components work properly.
So, if you love technology, crave self-challenge, and want to build a cool and practical tech project with your own hands, then follow this article and let's start this learning journey together!
Project Description
We have already made several Bluetooth remote control cars, including "ESP32-C3 Three-Wheel Bluetooth Car", "Mecanum Wheel Four-Wheel Car", and "Camera Bluetooth Car" (not yet released).
This project uses the LCSC ESP32S3 development board, purchased for 9.9 yuan, to make some innovations and improvements, building a minimalist Bluetooth remote control car:
Minimalism: use as few electronic components as possible to improve integration and reduce cost.
Simplified manufacturing: try to avoid SMD electronic components, use through-hole components to reduce soldering difficulty.
Practicality: use rubber wheels instead of Mecanum wheels for more stable driving and less noise.The physical video effect is as follows:
Hardware Design
1. Main Control Chip
LCSC ESP32S3R8N8 development board, a high-performance portable Wi-Fi and Bluetooth development board, with all materials fully open source, rich tutorials and cases, easy to get started, and project-based learning. It supports multiple development environments such as ESP-IDF, Arduino IDE, MicroPython, and is a favorite among makers.
See the official website introduction LCSC ESP32S3R8N8 Development Board.
2. Motor Driver

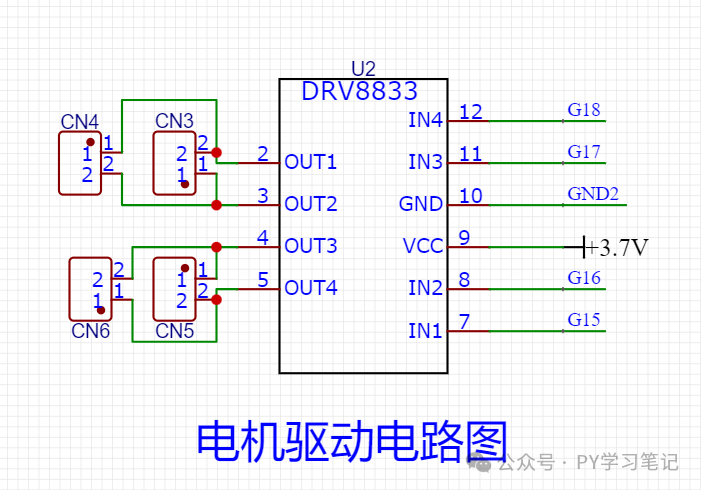
Rubber wheels cannot move horizontally left and right like Mecanum wheels. The two wheels on the left and the two wheels on the right rotate in the same direction, so the two left motors can be connected in parallel as one group, and the two right motors can be connected in parallel as another group. Only one small domestic DRV8833 motor driver module is used to drive 4 DC gear motors. This is also the biggest simplification of this project.
The schematic is as follows:
3. Power Supply Scheme
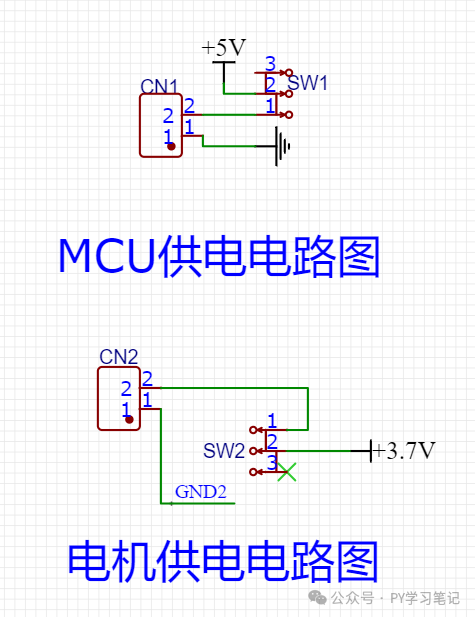
A two-channel power supply scheme is adopted: one channel supplies power to the ESP32S3 development board, and the other supplies power to the motors, to avoid mutual interference.
- The power supply for the ESP32S3 development board refers to "Common Development Board Power Supply Design Schemes (3.3V, 5V power supply schemes)". The 3.7V lithium battery is directly connected to the 5V pin of the ESP32S3 development board, and the development board will step down the 3.7V to 3.3V for the MCU to use.
- The motor is powered directly by a 3.7V lithium battery through the DRV8833, without the need for voltage step-down. If you want the car to be faster, you can consider using two 3.7V lithium batteries for power supply; the 7.4V voltage can make the car faster.
4. Designed Car Mainboard (PCB Board)
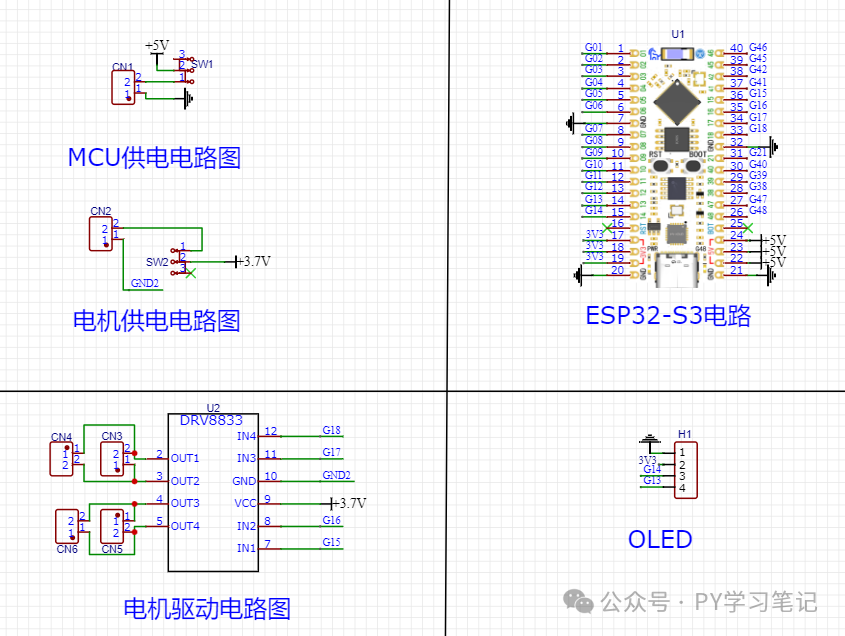
The car mainboard does not use any SMD electronic components. Modules such as ESP32S3 and DRV8833 are fixed with 2.54mm headers, and the battery and motors are connected with 2P 2.54mm terminal blocks, which is convenient for soldering, assembly, and component reuse.
Schematic:
PCB rendering:
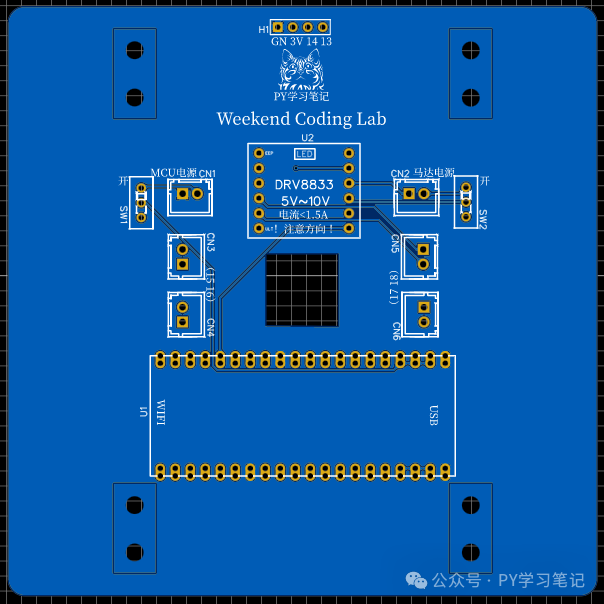
Open-source address: LCSC Open Source Plaza - My Project
5. Motors, Wheels, and Mounting Brackets
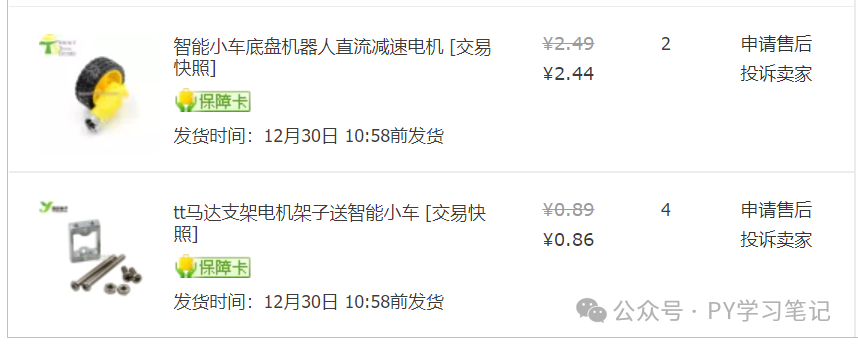
Bought online: 4 motors, 4 wheels, and 4 mounting brackets, totaling less than 15 yuan.
Mecanum wheels have the characteristic of freely changing the driving direction, but they have poor stability, slip easily, and are noisy. After using rubber wheels instead, the driving is stable, and the tires are almost noise-free (the noise comes from the gear motors).
6. Remote Control
Bluetooth is divided into Classic Bluetooth and Bluetooth Low Energy (BLE). BLE is generally Bluetooth 4.0 and above.
The LCSC ESP32S3 development board supports BLE. This project uses the BLE mobile phone Bluetooth APP — Bluefruit Connect. See ESP32-C3 and MicroPython Bluetooth Remote Control Car (Part 2)
Operation diagram:

7. Battery
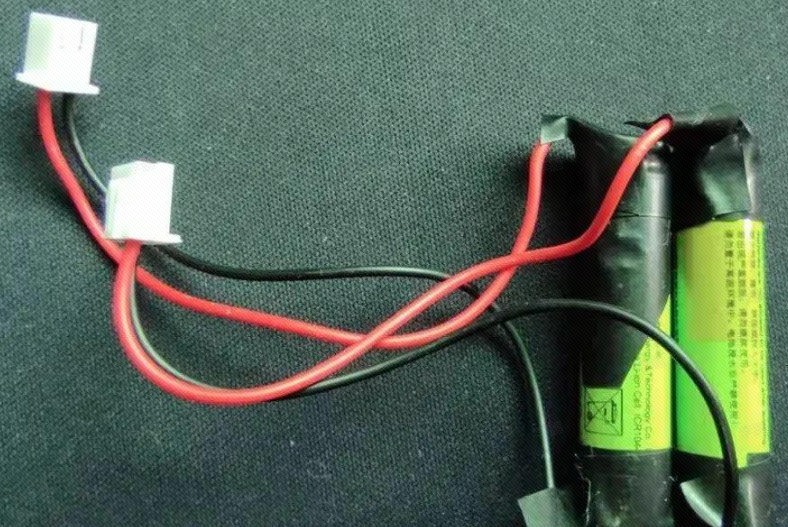
Two 3.7V lithium batteries with XH2.54 terminals. The ones we used were removed from a broken Xiaomi electric toothbrush.
8. Final Effect Display
Front photo:
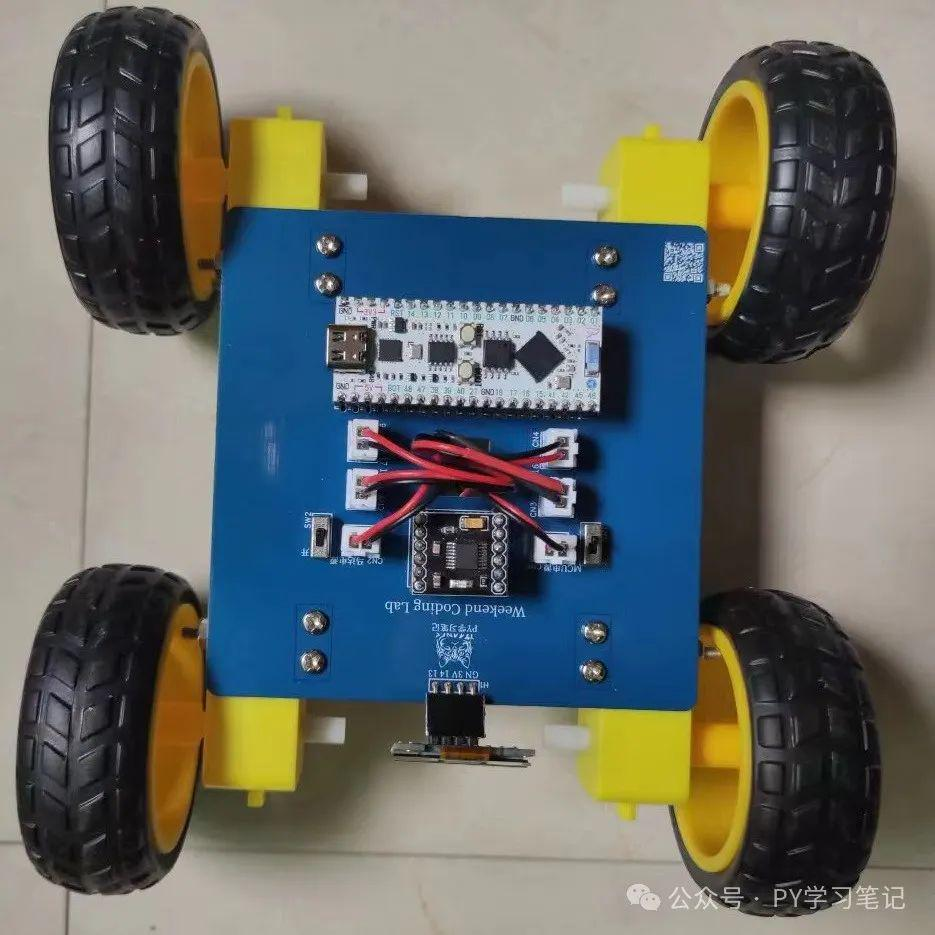
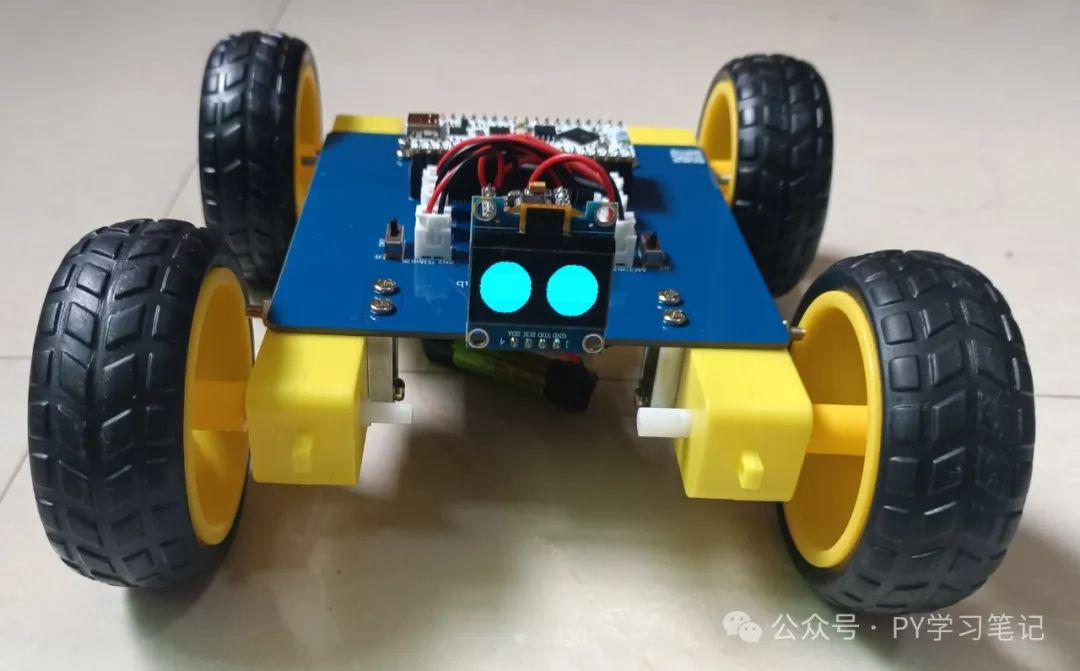
Back photo:
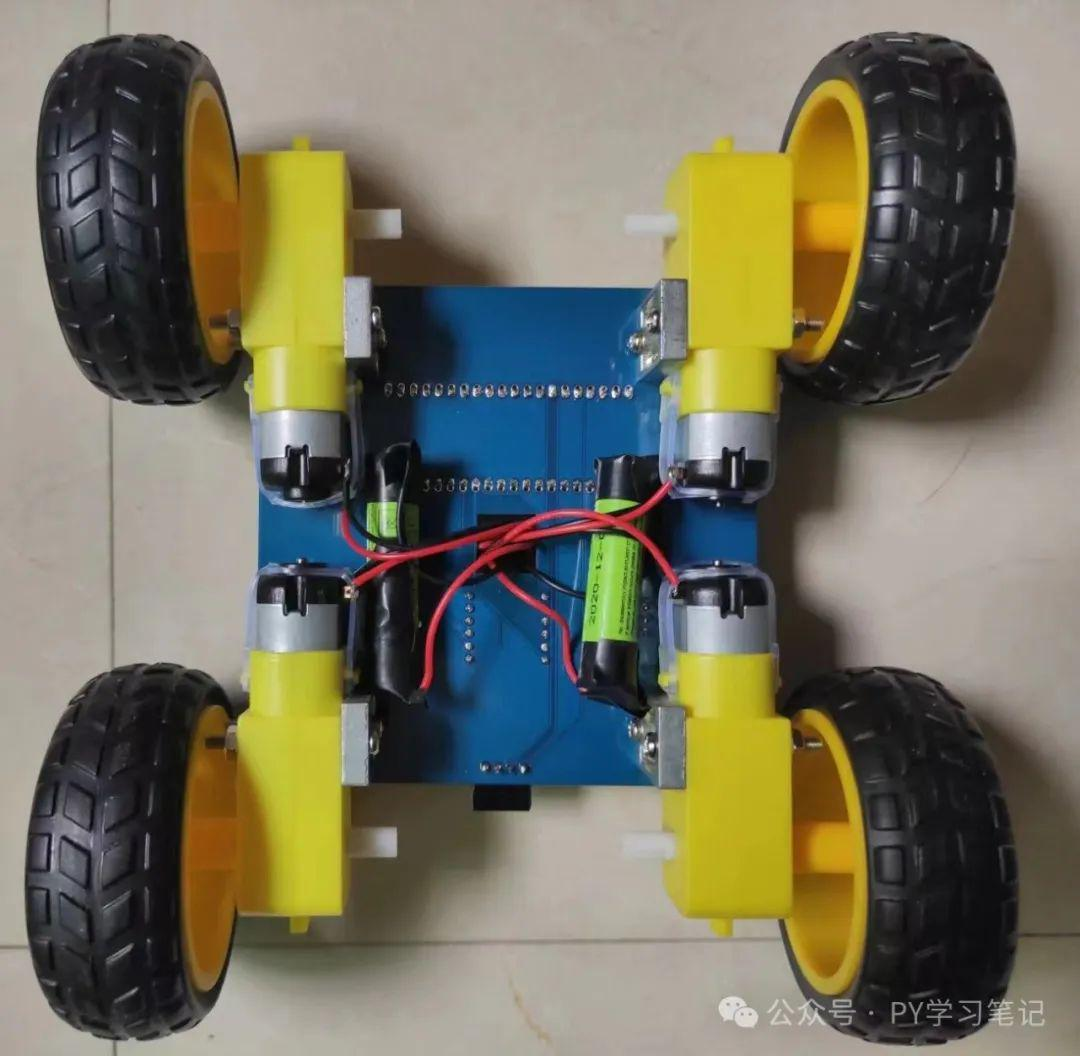
Hardware notes:
- The LCSC ESP32S3 Bluetooth remote control car does not include PCB prototyping, shipping, or labor costs. The cost is about 30 yuan (ESP32S3 development board 9.9 yuan + DRV8833 module 2 yuan + motors, wheels, brackets 15 yuan + other headers, wires, etc. about 3 yuan).
- The car mainboard (PCB board) has no SMD electronic components, only through-hole headers, 2P terminals, and switches need to be soldered, which is easy to solder and very suitable for beginner practice.
- According to functional requirements, you can add servos, ultrasonic sensors, infrared line-following, OLED, camera and other modules on the car mainboard (PCB board) to form an ultrasonic obstacle avoidance car or an infrared line-following car, etc.
Software Design
1. Wheel Steering Test
In the hardware design, we connected the two left motors in parallel as one group and the two right motors in parallel as another group. We first need to test whether the two motors in each group can rotate in the same direction, and find out the pins corresponding to each rotation direction. Reference test code is as follows:
# Define motor pins: Left means left, Right means right, 1 means forward, 0 means backward
Left0 = Pin(15,Pin.OUT)
Left1 = Pin(16,Pin.OUT)
Right0 = Pin(17,Pin.OUT)
Right1 = Pin(18,Pin.OUT)
# Test
Left1.value(1)
Left0.value(0)
Right1.value(1)
Right0.value(0)When soldering the motor power wires, it is recommended to use wires of different colors to distinguish them. Note that the two wires should be in the same direction. When assembled on the Bluetooth remote control car, the power wires happen to be reversed. As shown below:
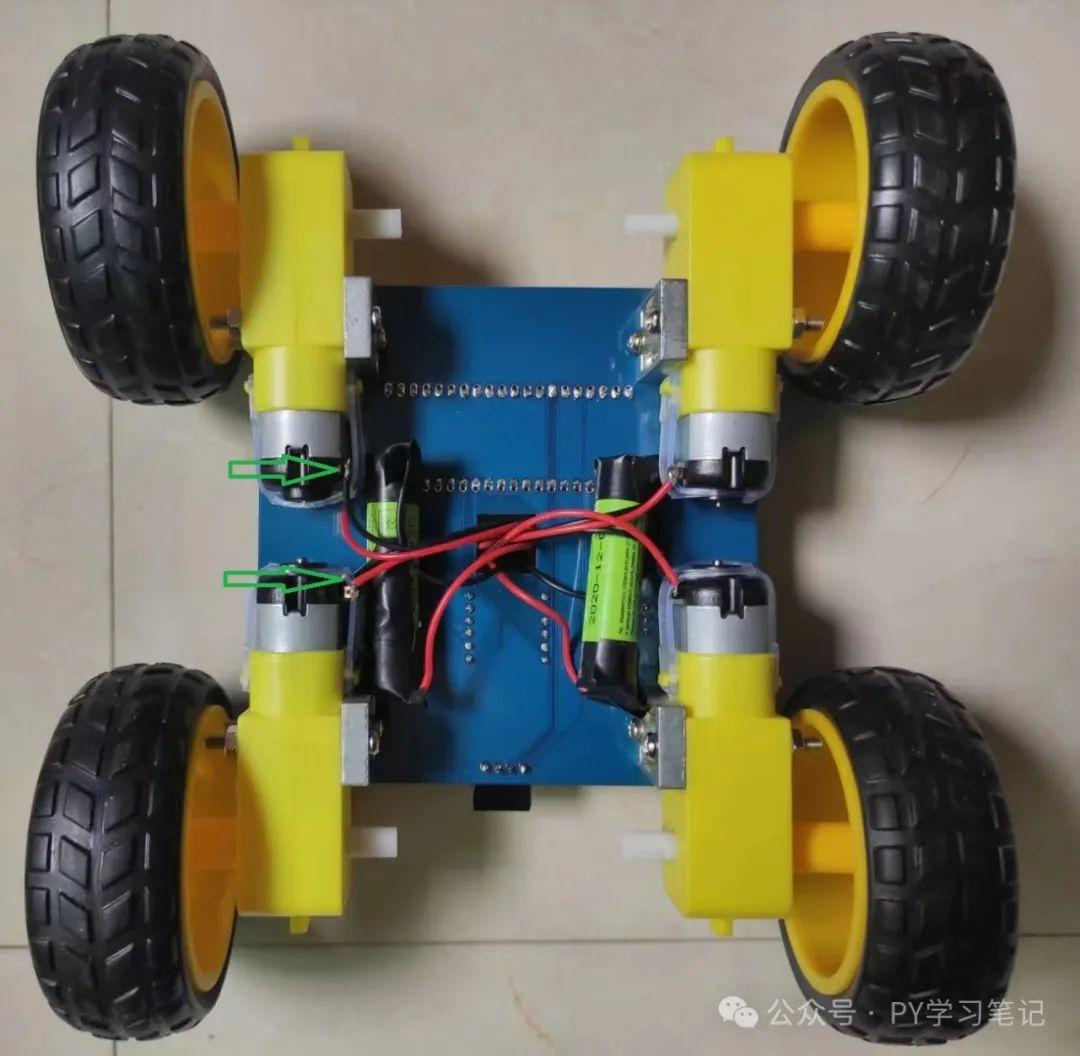
If the soldering is not in the same direction, you need to re-solder.
2. Driving Functions
After determining the wheel steering, you can write the driving functions. Rubber wheels cannot move horizontally left and right like Mecanum wheels, so the driving functions are relatively simple. Reference code is as follows:
# Car moves forward
def cargo():
    Left1.value(1)
    Left0.value(0)
    Right1.value(1)
    Right0.value(0)

# Car moves backward
def carback():
    Left1.value(0)
    Left0.value(1)
    Right1.value(0)
    Right0.value(1)

# Car stops
def carstop():
    Left1.value(0)
    Left0.value(0)
    Right1.value(0)
    Right0.value(0)

# Car turns left
def carleft():
    Left1.value(0)
    Left0.value(1)
    Right1.value(1)
    Right0.value(0)

# Car turns right
def carright():
    Left1.value(1)
    Left0.value(0)
    Right1.value(0)
Right0.value(1)● Turning principle: When the left wheels move forward and the right wheels move backward, the car turns right. Turning left works the same way.3. Bluetooth Advertising and Connection
You first need to configure Bluetooth (code found online) so that the mobile BLE Bluetooth APP (Bluefruit Connect) can connect to Bluetooth normally, then test the data sent by each button press on the APP. Reference code is as follows:
class ESP32_BLE():
    # Bluetooth initialization
    def __init__(self, name):
        self.led = Pin(48, Pin.OUT)     # Configure LED pin as output
        self.timer1 = Timer(0)          # Configure timer
        self.name = name
        self.ble = bluetooth.BLE()      # Create Bluetooth object
        self.ble.active(True)           # Enable Bluetooth
        self.ble.config(gap_name=name)  # Configure Bluetooth info
        self.disconnected()             # Set timer interrupt
        self.ble.irq(self.ble_irq)      # Bluetooth event handling
        self.register()                 # Configure Bluetooth UUID
        self.ble.gatts_write(self.rx, bytes(100)) # By default, Bluetooth only receives 20 bytes; here it is changed to receive 100 bytes
        self.advertiser()               # Bluetooth advertising
        self.ok = 0

    # Bluetooth connected, turn off LED
    def connected(self):
        self.timer1.deinit()
        self.led.value(0)
        print("connected ok")

    # Bluetooth not connected, LED blinks
    def disconnected(self):
        self.timer1.init(period=100, mode=Timer.PERIODIC, callback=lambda t: self.led.value(not self.led.value()))

    # Bluetooth event handling
    def ble_irq(self, event, data):
        global BLE_MSG
        if event == 1: # _IRQ_CENTRAL_CONNECT: phone connected to this device
            self.connected()
        elif event == 2: # _IRQ_CENTRAL_DISCONNECT: phone disconnected from this device
            if self.ok==0:
                self.advertiser()
                self.disconnected()
        elif event == 3: # _IRQ_GATTS_WRITE: phone sent data
            buffer = self.ble.gatts_read(self.rx)
            BLE_MSG = buffer.decode('UTF-8').strip()

    # Bluetooth UUID configuration
    def register(self):
        service_uuid = '6E400001-B5A3-F393-E0A9-E50E24DCCA9E'
        reader_uuid = '6E400002-B5A3-F393-E0A9-E50E24DCCA9E'
        sender_uuid = '6E400003-B5A3-F393-E0A9-E50E24DCCA9E'

        services = (
            (
                bluetooth.UUID(service_uuid),
                (
                    (bluetooth.UUID(sender_uuid), bluetooth.FLAG_NOTIFY),
                    (bluetooth.UUID(reader_uuid), bluetooth.FLAG_WRITE),
                )
            ),
        )

        ((self.tx, self.rx,), ) = self.ble.gatts_register_services(services)

    # Bluetooth advertising configuration
    def advertiser(self):
        name = bytes(self.name, 'UTF-8')
        adv_data = bytearray(b'\x02\x01\x02') + bytearray((len(name) + 1, 0x09)) + name
        self.ble.gap_advertise(100, adv_data)
        print("Waiting for connection: %s" % adv_data)
        print("\r\n")

# Configure Bluetooth
ble = ESP32_BLE("ESP32S3BLE")

# Configure LED
led = Pin(48, Pin.OUT)

BLE_MSG = ""

while True:
    if len(BLE_MSG)>0:
        print(BLE_MSG)
        BLE_MSG = ""
sleep_ms(100)When Bluetooth is waiting for connection, the LED blinks; when the mobile Bluetooth APP connects to the ESP32S3, the blinking stops;
● When the mobile APP disconnects, Bluetooth advertising restarts and the LED blinks again.
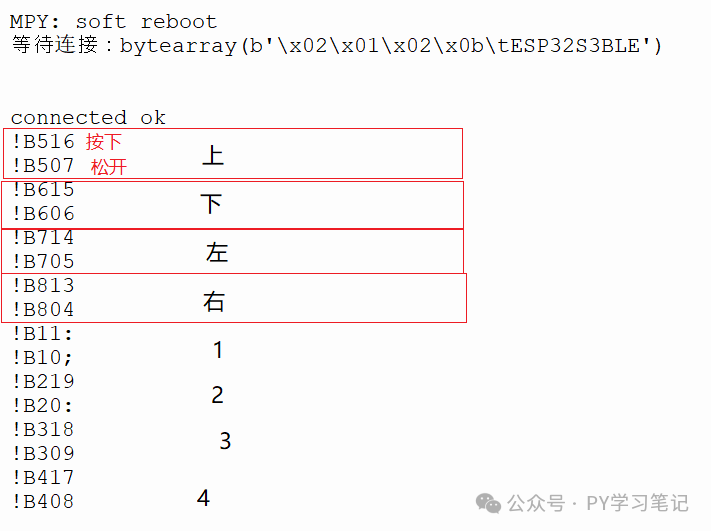
● After the Bluetooth connection is successful, the mobile Bluetooth APP sends a set of data when a button is pressed, and sends another set of data when the button is released. The program prints out the data sent via Bluetooth.
Test result:
4. Implement Bluetooth Remote Control
Based on the data sent via Bluetooth, use if/elif to determine the car's action (forward, backward, left turn, right turn, stop) to implement the remote control function. Reference code is as follows:
while True:
    if len(BLE_MSG)>0:
        if BLE_MSG in ["!B507","!B606","!B705","!B804","!B10;","!B20:","!B309","!B408","stop"]: # Release button to stop
            print(">>%s<<————stop" % BLE_MSG)
            carstop()
        elif BLE_MSG == "!B516":  # Press the APP up key to move forward
            print(">>%s<<————forward" % BLE_MSG)
            cargo()
        elif BLE_MSG == "!B615":  # Press the APP down key to move backward
            print(">>%s<<————backward" % BLE_MSG)
            carback()
        elif BLE_MSG == "!B714":  # Press the APP left key to move left
            print(">>%s<<————left" % BLE_MSG)
            carleft()
        elif BLE_MSG == "!B813":  # Press the APP right key to move right
            print(">>%s<<————right" % BLE_MSG)
            carright()

        BLE_MSG = ""
sleep_ms(100)● All data sent via Bluetooth when a button is released must be placed in the stop if-statement, so that the action starts when the button is pressed and stops when the button is released.
5. Complete Code
from machine import Pin
from machine import Timer
from time import sleep_ms
import time
import bluetooth

# Define motor pins: Left means left, Right means right, 1 means forward, 0 means backward
Left0 = Pin(15,Pin.OUT)      # GPIO15 pin, left wheel motor backward
Left1 = Pin(16,Pin.OUT)     # GPIO16 pin, left wheel motor forward
Right0 = Pin(17,Pin.OUT)     # GPIO17 pin, right wheel motor backward
Right1 = Pin(18,Pin.OUT)      # GPIO18 pin, right wheel motor forward

BLE_MSG = ""

# Car moves forward
def cargo():
    Left1.value(1)
    Left0.value(0)
    Right1.value(1)
    Right0.value(0)

# Car moves backward
def carback():
    Left1.value(0)
    Left0.value(1)
    Right1.value(0)
    Right0.value(1)

# Car stops
def carstop():
    Left1.value(0)
    Left0.value(0)
    Right1.value(0)
    Right0.value(0)

# Car turns left
def carleft():
    Left1.value(0)
    Left0.value(1)
    Right1.value(1)
    Right0.value(0)

# Car turns right
def carright():
    Left1.value(1)
    Left0.value(0)
    Right1.value(0)
    Right0.value(1)

class ESP32_BLE():
    # Repeated with step 3, please copy it yourself

def main():
    global BLE_MSG

    try:
        # Car on standby first
        carstop()

        # Configure Bluetooth
        ble = ESP32_BLE("ESP32S3BLE")

# Configure LED
        led = Pin(48, Pin.OUT)

        while True:
            if len(BLE_MSG)>0:
                if BLE_MSG in ["!B507","!B606","!B705","!B804","!B10;","!B20:","!B309","!B408","stop"]: # Release button to stop
                    print(">>%s<<————stop" % BLE_MSG)
                    carstop()
                elif BLE_MSG == "!B516":  # Press the APP up key to move forward
                    print(">>%s<<————forward" % BLE_MSG)
                    cargo()
                elif BLE_MSG == "!B615":  # Press the APP down key to move backward
                    print(">>%s<<————backward" % BLE_MSG)
                    carback()
                elif BLE_MSG == "!B714":  # Press the APP left key to move left
                    print(">>%s<<————left" % BLE_MSG)
                    carleft()
                elif BLE_MSG == "!B813":  # Press the APP right key to move right
                    print(">>%s<<————right" % BLE_MSG)
                    carright()

                BLE_MSG = ""
            sleep_ms(100)

    except KeyboardInterrupt:
        pass

if __name__ == "__main__":
    main()